Ever since the 'real' serial comport (the hardwired connector on the rear of your PC) has been replaced with all types of 'virtual' alternatives like IR ports or Serial to USB devices, it has been a cause for all kind of trouble. And I've seen many of them, but the one I found this morning was new to me. Suddenly one of the programs I've written myself showed 18 comports to choose from. Now the program uses a dedicated function to enumerate the available ports, so obviously I thought it had something to do with a bug in my software. Also because the 'Hardware manager' of the PC only showed the two comports that are actually available. On the other hand I found that some other software that uses serial ports showed the same behaviour.
So I looked at the registry ( HKEY_LOCAL_MACHINE\HARDWARE\DEVICEMAP\SERIALCOMM) to find out which port were actually registered. And this showed all 18 as \Device\VComxx, where xx is the port number. So obviously something was creating virtual serial com ports. But what? I did not add any hardware to my PC that could cause this, nor did I install any serial com port related software or drivers.
So finally I located in the System Properties -> Device manager under 'System Devices' two suspicious entries: 'NCF Virtual serial bus enumerator' and 'VXCOM port'. The first turned out to be the 'Nokia Communication Framework', something I installed long ago in an attempt to communicate with my Nokia phone. After searching on the web for the second one, I found only a few entries, but it seems this one is related to the Windows Mobile 6 SDK, which I indeed installed last week. And when I disabled this driver, the problem was gone.
Apparently VXCOM is a virtual com driver used for the SmartPhone emulator. Why it reserves 18 ports at startup, even though I never used this emulator is a mystery to me...
Monday, October 22, 2007

Sunday, September 09, 2007
Mouse toTrackball to Centipede

Born in '65, it's inevitable that I grew up playing arcade games in the local arcade, re-discovered the joy of the simple games of those days and found my way to the MAME project.
I downloaded the the MAME executable and a bunch of (illegal...?) games, and I carried it with me several years, copying it to every new PC, and occasionally playing some of my favourite games. What always created a slight itch was the fact that playing on a computer keyboard does not really come near the 'real arcade experience'. So, like many others.. I would love to build a real arcade cabinet, with real joystick, trackball, spinner and fire buttons. Of course I lack the time to build it, a place to store it and even time to play it, but the idea remains. Looking around I found several on-line shops that sell all necessary parts from controls to marquees to make it look exactly like the original, but adding it all together it gets quite expensive. Certainly controls like a trackball and a spinner are costly items. And actually a spinner does not seem like a difficult thing to make yourself, but I decided to start with the trackball, since I already owned this.
 It is a Wico-trackball that was manufactured in 1983(!) for the then popular TI-99 home computer. Actually this seems bad timing, since TI exited the home computer market by the end of '83... Well, I bought the trackball a few years later for a few bucks, and first interfaced it to my Commodore 64, but hardly ever used it. Since a trackball and a standard computer mouse (the ball type) are very similar I thought it would not be too difficult to combine the two and have a 'mouse compatible' trackball. Fortunately 'standard' mouses can be found in large piles lying around unused in almost every office, so I soon found a suitable Logitech USB type that no one cared about anymore. First I thought it should be possible to use the original optical switches of the Wico, and just wire these to the mouse electronics. But since neither the mouse nor the trackball switches have any type numbers stamped on them so I could not easily compare the connections and make a new routing plan, I decided it would be easier just to remove the switches from the mouse, and mount them inside the trackball, completely discarding the original trackball electronics.
 So I just removed the Infrared LEDs and the opto switches from the mouse board, mounted them on a piece of prototyping board, and re-wired them to the original contacts. The image here shows the result. Bottom right you see the original mouse electronics. Bottom left you see the piece of prototype board holding the LED and the opto-switch. Right top you see a little piece of the second board just before it's put in place. Top left you also see the contacts of the 'fire' button. The wires from this I just cut to the right length and soldered them to the rear of the switch that used to be the left mouse button.
And it works great!. Finally I can play one of my favourites (Centipede) the way it was intended. So now I'm ready to take the next step: build a 'Rotary controller' or 'Spinner' for my all time favourite game : Tempest .Right now I'm chasing another unused mouse...
Wednesday, August 15, 2007
The Big Step: Microsoft Visual Studio
So it finally had to happen. I purchased and started to use Visual Studio 2005. After using Borland C++ Builder for more than 10 years for all my Windows (and even DOS) programming, the Pocket PC platform turned out be the decision maker. From the start the only way to write programs for the Pocket PC platform has been through Microsoft. And they also made it very easy by giving away the free Embedded Visual Basic, followed by Embedded VisualC. But today, now everybody has a Pocket PC, none of these tools is being supported, and they also refuse to work with the new Windows Mobile 5 devices. Now this could be a great starting point for some Microsoft bashing, but actually I read some explanation on a MS-Developer blog that makes sense. Since the embedded versions where completely separate projects within Microsoft, the development and support started to suffer from the fact that the developers also worked on the commercial Visual Studio product. And it's just a fact of life that supporting a commercial product has a higher priority...
But I've written all my software using EVC 3 and 4. And so I struggled some time by using old PocketPC's for debugging, actually waiting for Borland to come up with the 'Delphi for PocketPC'. But I don't think this will happen for a while, and I even wonder if they ever will produce something for the PocketPC platform. So I finally had to get Visual Studio 2005 to continue supporting my embedded Visual C apps. Fortunately I could go for an Visual Studio 2005 Upgrade, because I already owned C++ Builder, making it a bearable € 250,-.
And now I must agree, the Visual Studio environment a a giant leap forward compared to the old EVC programs. The editor is much more up to date, it compiles faster, has a better debugger, and (surprise, surprise) also supports direct emulation on your desktop PC, even when your program uses ActiveX controls or external DLL's !.
But I've written all my software using EVC 3 and 4. And so I struggled some time by using old PocketPC's for debugging, actually waiting for Borland to come up with the 'Delphi for PocketPC'. But I don't think this will happen for a while, and I even wonder if they ever will produce something for the PocketPC platform. So I finally had to get Visual Studio 2005 to continue supporting my embedded Visual C apps. Fortunately I could go for an Visual Studio 2005 Upgrade, because I already owned C++ Builder, making it a bearable € 250,-.
And now I must agree, the Visual Studio environment a a giant leap forward compared to the old EVC programs. The editor is much more up to date, it compiles faster, has a better debugger, and (surprise, surprise) also supports direct emulation on your desktop PC, even when your program uses ActiveX controls or external DLL's !.
Tuesday, May 01, 2007
Creating Q-Web
To visualise data that is related to geographical locations (e.g. the local weather) nothing beats a good map with some clear symbols that reveal data from a database. The following series describes my route towards a database driven ASP.NET application that shows data as collected by the 'Discharge measurement' stations. The company I work for (Qmetrix) supplies these stations to local water management authorities. They measure the flow of water in a river or stream, combine it with the water-level and the local depth-profile and calculate the total cubic meters of water per second that passes by.
First I needed a nice map. I used MapBuilder, the excellent tool to manipulate Google maps. Now what I need for the webpage is a image for the area of interest, for which I know the exact coordinates of the left-top and right-bottom corner. Here is how:
In MapBuilder first click 'New Map' and enter a (short) name and a description. Then return to 'Edit Map'. Disable the 'Automatic Zoom' feature. Make sure the area of interest is completely visible. (Find it quick by just typing the name and country of a city that that in the area in the "Location Search & Quick Navigation" box )
Click in the left top corner, this will show a blinking marker. Select a small marker type, type 'Left Top' in the 'Caption' box and click 'Add'.
Repeat these steps for the 'Right-Bottom' marker. Now click 'Save Center, Zoom, Maptype'. Select 'Map Controls' in the menu, and disable all visible features. Don't forget to click the 'Save' button at the bottom of this screen.
Now choose 'Preview' in the menu. It might be required to shift the map a little to get both markers in the right place.
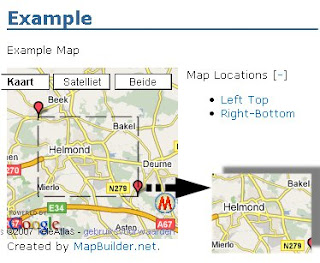
If required you can go back to the 'Map Controls' screen, and increase the map width and height. Now if you don't want to include the Google and Mapbuilder trademarks you must make sure they fall outside the area as enclosed by the two markers. If the map is right, capture the whole screen, using a screen-capture utility or just [Shift][PrtScreen]. Load the captured image in an image editor, and cut out the exact area Top left to Bottom right. Save this as a new (.jpg or .png) image.
Now go back to MapBuilder, and make a note of the exact coordinates of Top-Left and Right-Bottom. (I usually just click on the markers, and Copy-Paste the 'Latitude' and 'Longitude' fields to a Notepad text file.)
While this text file is open you might also write down the exact sizes (in pixels) of the map image we just created. Usually this can be found using the image editor, but you can also locate the file in Explorer, right click it and select 'Properties'. Hidden under an 'Advanced->' button you find the exact size of the image in pixels.
First I needed a nice map. I used MapBuilder, the excellent tool to manipulate Google maps. Now what I need for the webpage is a image for the area of interest, for which I know the exact coordinates of the left-top and right-bottom corner. Here is how:
In MapBuilder first click 'New Map' and enter a (short) name and a description. Then return to 'Edit Map'. Disable the 'Automatic Zoom' feature. Make sure the area of interest is completely visible. (Find it quick by just typing the name and country of a city that that in the area in the "Location Search & Quick Navigation" box )
Click in the left top corner, this will show a blinking marker. Select a small marker type, type 'Left Top' in the 'Caption' box and click 'Add'.
Repeat these steps for the 'Right-Bottom' marker. Now click 'Save Center, Zoom, Maptype'. Select 'Map Controls' in the menu, and disable all visible features. Don't forget to click the 'Save' button at the bottom of this screen.
Now choose 'Preview' in the menu. It might be required to shift the map a little to get both markers in the right place.

If required you can go back to the 'Map Controls' screen, and increase the map width and height. Now if you don't want to include the Google and Mapbuilder trademarks you must make sure they fall outside the area as enclosed by the two markers. If the map is right, capture the whole screen, using a screen-capture utility or just [Shift][PrtScreen]. Load the captured image in an image editor, and cut out the exact area Top left to Bottom right. Save this as a new (.jpg or .png) image.
Now go back to MapBuilder, and make a note of the exact coordinates of Top-Left and Right-Bottom. (I usually just click on the markers, and Copy-Paste the 'Latitude' and 'Longitude' fields to a Notepad text file.)
While this text file is open you might also write down the exact sizes (in pixels) of the map image we just created. Usually this can be found using the image editor, but you can also locate the file in Explorer, right click it and select 'Properties'. Hidden under an 'Advanced->' button you find the exact size of the image in pixels.
Wednesday, September 06, 2006
Joel's club of amazing employees..
You might have notice my link to the site of 'Joel on software'. I read his articles on a regular basis, and usually I either fully agree with him, or consider his point of view as refreshing. But in one of his more recent articles he explains how his company recruites new employees and this time I feel FogCreek Software is probably located on a different planet. First I think it's almost incredible that a company spends so much time and money on recruiting. Second I wonder why his company needs such a continuous supply of the most brilliant programmers, since as far as I can see hey're only selling three major software packages. None of which I ever heard before I started reading his articles, so they certainly do not come near the Microsoft, Oracle or even Computer Associates in quantities.
Nevertheless Joel Spolsky, who runs and manages this enervating business seems to have so much spare time that he can write almost numerous articles for his blog, give interviews, follow his fellow bloggers and comment on them if necessary and even read all 100 articles that appear on MSDN every day... And I don't know about you, but creating a post like this takes me at least two evenings, and when it comes to a a more practical posting (which requires some kind of research) it often takes me a week to complete it.
So by now I'm beginning to think that Joel is not a real person (anymore). Yes, someone with this name probably started up FogCreek, and started this , now famous, weblog. But I think somewhere in time the 'brand name' was probably bought by some huge company ( could be 'M'...) and now the texts are created by a team of professional writers. And since Joels opinion about MicroSoft always was mildly positive, all they have to do is to keep it that way.
Nevertheless Joel Spolsky, who runs and manages this enervating business seems to have so much spare time that he can write almost numerous articles for his blog, give interviews, follow his fellow bloggers and comment on them if necessary and even read all 100 articles that appear on MSDN every day... And I don't know about you, but creating a post like this takes me at least two evenings, and when it comes to a a more practical posting (which requires some kind of research) it often takes me a week to complete it.
So by now I'm beginning to think that Joel is not a real person (anymore). Yes, someone with this name probably started up FogCreek, and started this , now famous, weblog. But I think somewhere in time the 'brand name' was probably bought by some huge company ( could be 'M'...) and now the texts are created by a team of professional writers. And since Joels opinion about MicroSoft always was mildly positive, all they have to do is to keep it that way.
Thursday, July 27, 2006
Debugging CF applications on the PDA
In a previous post I mentioned that it's not a real problem that you cannot debug apps directly on your PDA because the application can be debugged on your desktop. Unfortunately this is not completely right, since it already has occured a few times that the desktop version behaved different after copying it to the PDA. So now I'm investigating the possibilities for debugging using the (free) Mdbg.exe tool . I found a good start at David Kline's CF Weblog. (to be continued..)
Tuesday, July 25, 2006
Intermezzo : Developers, developers, developers

The (in)famous 'Developers..' video by Steve Balmer.Probably everybody has seen this one. It's been on television, and you can find it on almost every website that tries to make fun of Microsoft. And even though I tend to think that it's a bit over the top, I sometimes just have to see this 19 seconds because it makes me feel good. Apart from the 'comic' level, it also has expresses a level of appreciation for 'us' developers that I seldom find in my everyday job. Don't get me wrong: I like, even love, what I do and I would probably make fun of anybody who would try to express some kind of appreciation. But sometimes I feel a little envy towards professionals that are more in the spotlights like journalists, politicians or actors. Let's face it, even the people that prepare the food for the people who cary the furniture in an everyday television series get their name mentioned on the title scroll...
Friday, July 21, 2006
Custom Components for the CF
After following all my own guidelines and creating a functional CF program for .NET2.0 ( the 'CFSimpleTerm' program, a serial communication terminal which you can find in the 'Downloads' section of C-Scope) I decided to start working on my first custom component. I found notes on the web everywhere that his was so simple in C#...
But ofcourse I wanted to create a custom component for the CF. Because one of the first things that strike you when developing CF applications (after finding out how 'simple' it is) is that the final application looks real 'basic', or even 'dull' I'd say. You cannot change fonts or colors of standard controls, and everything is flat (which is the standard for PocketPC's, I know, but I like it a little more fancy than that..). So I started out creating an enhanced button, with 3-D look, user definable color, and selectable font. Something like this:
So I used the 'Custom Component' wizard to create a 'xButton' class, derived from the standard Button. Something like this:
 And this is what it looked like after two struggling two evenings with the .NET Drawing and Event override functions. Color, font and text alignment can be selected, and there is a basic 3D look.
Finally I copied a sample program using this xButton control to my PocketPC, only to find out that the button is still the same flat, grey one as in my previous applications :-(
So what went wrong ? Microsoft has the answer on this page. The following line explains it all:
"...most of the standard controls, such as Button, ListBox or Label, don't allow you to override the OnPaint event and add custom drawing to them..." So much for my custom button that overrides the OnPaint event. Fortunately the solution is also given here. Custom controls for the CF should always start from the toplevel 'Control' class, which does allow the overriding of the OnPaint. And, how convenient, the forementioned article contains a lot more hints and tips on creating a custom image button, so I suppose I had to start all over. I don't think just changing 'Button' to 'Control' in the class declaration will be sufficient. But ofcourse I did try it, just to see what happens. And to my (big) surprise, the program compiled without any warning, the button looked exactly the same when running the program on my PC, and... it also worked on the PDA ! So much for my first step towards what I hope will be a series of 'fancy' controls for the CF.
(Hey hey, but how did you actually do it ? Just look at the source here to find out...)
But ofcourse I wanted to create a custom component for the CF. Because one of the first things that strike you when developing CF applications (after finding out how 'simple' it is) is that the final application looks real 'basic', or even 'dull' I'd say. You cannot change fonts or colors of standard controls, and everything is flat (which is the standard for PocketPC's, I know, but I like it a little more fancy than that..). So I started out creating an enhanced button, with 3-D look, user definable color, and selectable font. Something like this:
So I used the 'Custom Component' wizard to create a 'xButton' class, derived from the standard Button. Something like this:
using System;
using System.Drawing;
using System.Windows.Forms;

namespace xControls
{
/// <summary>
/// Description of UserControl1.
/// </summary>
public partial class xButton : Button
{
    private Color m_color1 = Color.LightGreen;  //first color
    private Color m_color2 = Color.DarkBlue;   // second color
.... more code....
 And this is what it looked like after two struggling two evenings with the .NET Drawing and Event override functions. Color, font and text alignment can be selected, and there is a basic 3D look.
Finally I copied a sample program using this xButton control to my PocketPC, only to find out that the button is still the same flat, grey one as in my previous applications :-(
So what went wrong ? Microsoft has the answer on this page. The following line explains it all:
"...most of the standard controls, such as Button, ListBox or Label, don't allow you to override the OnPaint event and add custom drawing to them..." So much for my custom button that overrides the OnPaint event. Fortunately the solution is also given here. Custom controls for the CF should always start from the toplevel 'Control' class, which does allow the overriding of the OnPaint. And, how convenient, the forementioned article contains a lot more hints and tips on creating a custom image button, so I suppose I had to start all over. I don't think just changing 'Button' to 'Control' in the class declaration will be sufficient. But ofcourse I did try it, just to see what happens. And to my (big) surprise, the program compiled without any warning, the button looked exactly the same when running the program on my PC, and... it also worked on the PDA ! So much for my first step towards what I hope will be a series of 'fancy' controls for the CF.
(Hey hey, but how did you actually do it ? Just look at the source here to find out...)
Wednesday, July 12, 2006
More CF compiling options
It's nice to see how suddenly more people start thinking along the same lines. Stefan Cruysberghs has created an article on the Borland developers network showing how to create CF applications using Delphi. I just read it, and it feels like a deja-vu, since it roughly follows the same procedure as in my previous posts. On the site of JED-Software you can even find a complete package to make Delphi more 'CF-Enabled'. Chee Wee Chua has posted a Compact Framework Project Preprocessor (MakeCFCompatible) to the Borland CodeCentral that's remarkable like my own CFPreProcessor. Ofcourse all of these solutions assume that you are the fortunate owner of Delphi 6 or the Borland Developer Suite 2006, and do not (yet) support .NET 2.0.
Friday, June 02, 2006
SDK's and Emulator for the Compact framework
I Mentioned earlier that there is no emulator available for the CF. But now there is. Microsoft has released the Mobile 5 Emulator as a standalone package. Here it is:
Standalone Device Emulator 1.0 with Windows Mobile OS Images.
After installing it you can run it like any other program from Programs in your Start Menu. The first time you start it, select PocketPC, Coldboot. Note that it will take almost a minute to boot for the first time, so be patient.
Unfortunately this version does not have the Compact Framework 2.0 installed, so we'll have to do that manually:
- First get the CompactFramework Installation file (NETCFSetupv2.msi)
- Make sure you have ActiveSync 4.0 or higher installed.
- Open the 'Device Emulator Manager' (it's in the same section of the Programs menu where you just started the PocketPC emulator). If the PocketPC emulator is running you will see it in the Device Manager screen as a button with a green arrow, followed by de Device ID.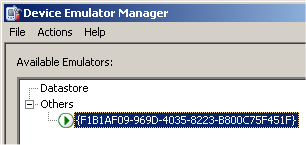
- Select it, and open the Actions menu. Select 'Cradle'. This is the same as connecting an actual PocketPC to your PC by putting it in the cradle or docking station. Usually ActiveSync will now pop-up and connect, but if it does not, just open ActiveSync,and select 'File->Get Connected'.
The Emulator now behaves exactly like a real device connected through ActiveSync.
- Now start the Compact Framework Installation (just double click on the 'NETCFSetupv2.msi' file and the installation will start automatically. It will first extract the installation to your harddisk, then start up ActiveSync, and upload the installation to the emulator. The emulator will start the installation procedure.
Now pay attention : when the installation is finished on the emulator DO NOT LET IT RESTART. If you do, it will perform a coldboot, and your installation is gone. Select 'File->Save State and Exit' instead. The whole ROM image, including hte CF 2.0 installation will now be saved. Next time you start the emulator, start the 'PocketPC - Savestate' and you'll have a Compact Framework 2.0 enabled Pocket PC at your desktop.
What's also nice to have when developing is theWindows Mobile 5.0 SDK for Pocket PC.
This contains all kind of usefull samples, images, projects and also the Windows.WindowsMobile namespaces. Now when you try to install it you will notice it first checks for the presence of Visual Studio, and if that's not available, it refuses to install :-(
So we just have to unpack the .msi file using the
'LessMSIerable' utility from http://blogs.pingpoet.com/ :-) I'm not 100% sure this is legal, but since it's so easy it would be foolish to forbid it.
Standalone Device Emulator 1.0 with Windows Mobile OS Images.
After installing it you can run it like any other program from Programs in your Start Menu. The first time you start it, select PocketPC, Coldboot. Note that it will take almost a minute to boot for the first time, so be patient.
Unfortunately this version does not have the Compact Framework 2.0 installed, so we'll have to do that manually:
- First get the CompactFramework Installation file (NETCFSetupv2.msi)
- Make sure you have ActiveSync 4.0 or higher installed.
- Open the 'Device Emulator Manager' (it's in the same section of the Programs menu where you just started the PocketPC emulator). If the PocketPC emulator is running you will see it in the Device Manager screen as a button with a green arrow, followed by de Device ID.

- Select it, and open the Actions menu. Select 'Cradle'. This is the same as connecting an actual PocketPC to your PC by putting it in the cradle or docking station. Usually ActiveSync will now pop-up and connect, but if it does not, just open ActiveSync,and select 'File->Get Connected'.
The Emulator now behaves exactly like a real device connected through ActiveSync.
- Now start the Compact Framework Installation (just double click on the 'NETCFSetupv2.msi' file and the installation will start automatically. It will first extract the installation to your harddisk, then start up ActiveSync, and upload the installation to the emulator. The emulator will start the installation procedure.
Now pay attention : when the installation is finished on the emulator DO NOT LET IT RESTART. If you do, it will perform a coldboot, and your installation is gone. Select 'File->Save State and Exit' instead. The whole ROM image, including hte CF 2.0 installation will now be saved. Next time you start the emulator, start the 'PocketPC - Savestate' and you'll have a Compact Framework 2.0 enabled Pocket PC at your desktop.
What's also nice to have when developing is theWindows Mobile 5.0 SDK for Pocket PC.
This contains all kind of usefull samples, images, projects and also the Windows.WindowsMobile namespaces. Now when you try to install it you will notice it first checks for the presence of Visual Studio, and if that's not available, it refuses to install :-(
So we just have to unpack the .msi file using the
'LessMSIerable' utility from http://blogs.pingpoet.com/ :-) I'm not 100% sure this is legal, but since it's so easy it would be foolish to forbid it.
Saturday, May 27, 2006
C# programming for the Compact Framework part 2
If you followed the steps from part 1 you've created a .NET CF program that runs on your PocketPC. No doubt you also tried to add functionality to the basic program, and soon found out that it isn't all good clean fun.
First, whenever you add a control from the sidebar, the IDE automatically adds a new reference to the required .NET assembly so the compiler complains about 'duplicates' and will not compile untill you remove the reference. This is not a real big problem, just don't forget to remove it before you compile. Also when you add controls by just copying them from the form (select the control you need, press [Ctrl]C and [Ctrl]V to add a copy) the IDE does not add a new reference.
Second, and this is worse, whenever you change something on the form, the IDE re-creates the form.designer.cs file, and all the CF-incompatible lines you just removed are back. So I created a little program (in C# ofcourse) that walks throught all .designer. files in a directory, finds lines with unsupported CF statements and turns them into comment. You can find it here.
Actually it loads a file named 'Exclude.txt' that contains the unsupported statements, and checks every line in the source code to see if it contains on of the words in the Exclude-file. If a match is found AND the source code line is not already a comment, the line is turned into a comment by adding '//' at the beginning of the line. I agree it's a rather crude solution, but it works fine. So if we enter this program in the 'Project->Project Options->Build Events' page as the 'Pre-build event', it is executed every time when we compile our code from the IDE, and there will be no error messages like 'System.Windows.Form.ComponentX does not contain a definition for MethodY'
Since the CFPreprocessor program is very basic, you should take care of the following:
- If the pre-build event is configured as shown above, the CFPreProcessor.exe file must be in the 'bin\Debug' directory of the project to be compiled, because this is the default directory when the compiler starts. It's probably better specify the full path (E.G. C:\CF\CFPreprocessor.exe)
- There are no warning messages in the IDE when the program runs or fails. It just writes a 'CFPreprocessor.log' file with each run, so if you think something is going wrong, just open this file to see what happened.
- Just add things to the Exclude.txt file if you run into another unsupported feature. I first considered it an option create a full list of unsupported methods from the 'Compact Framework Helpfile', but I think the program will soon get very slow, since it will have to check every line of code against every line in the Exclude file. I think it is best to keep this file as short as possible.
Another issue when programming for the CF is that it is really 'compact', so apart from the unsupported methods there are also a lot of controls that are not supported at all. In general you should stick to the the very basic Windows controls like Button, TextBox, Label, CheckBox, ComboBox etc. Anything more advanced or fancy, like MaskedTextBox, RichTextBox, CheckedListBox is probably not suported. It is good practice to check the .NET help first before entering any control, and see if it is supported.
First, whenever you add a control from the sidebar, the IDE automatically adds a new reference to the required .NET assembly so the compiler complains about 'duplicates' and will not compile untill you remove the reference. This is not a real big problem, just don't forget to remove it before you compile. Also when you add controls by just copying them from the form (select the control you need, press [Ctrl]C and [Ctrl]V to add a copy) the IDE does not add a new reference.
Second, and this is worse, whenever you change something on the form, the IDE re-creates the form.designer.cs file, and all the CF-incompatible lines you just removed are back. So I created a little program (in C# ofcourse) that walks throught all .designer. files in a directory, finds lines with unsupported CF statements and turns them into comment. You can find it here.
Actually it loads a file named 'Exclude.txt' that contains the unsupported statements, and checks every line in the source code to see if it contains on of the words in the Exclude-file. If a match is found AND the source code line is not already a comment, the line is turned into a comment by adding '//' at the beginning of the line. I agree it's a rather crude solution, but it works fine. So if we enter this program in the 'Project->Project Options->Build Events' page as the 'Pre-build event', it is executed every time when we compile our code from the IDE, and there will be no error messages like 'System.Windows.Form.ComponentX does not contain a definition for MethodY'
Since the CFPreprocessor program is very basic, you should take care of the following:
- If the pre-build event is configured as shown above, the CFPreProcessor.exe file must be in the 'bin\Debug' directory of the project to be compiled, because this is the default directory when the compiler starts. It's probably better specify the full path (E.G. C:\CF\CFPreprocessor.exe)
- There are no warning messages in the IDE when the program runs or fails. It just writes a 'CFPreprocessor.log' file with each run, so if you think something is going wrong, just open this file to see what happened.
- Just add things to the Exclude.txt file if you run into another unsupported feature. I first considered it an option create a full list of unsupported methods from the 'Compact Framework Helpfile', but I think the program will soon get very slow, since it will have to check every line of code against every line in the Exclude file. I think it is best to keep this file as short as possible.
Another issue when programming for the CF is that it is really 'compact', so apart from the unsupported methods there are also a lot of controls that are not supported at all. In general you should stick to the the very basic Windows controls like Button, TextBox, Label, CheckBox, ComboBox etc. Anything more advanced or fancy, like MaskedTextBox, RichTextBox, CheckedListBox is probably not suported. It is good practice to check the .NET help first before entering any control, and see if it is supported.
Thursday, May 25, 2006
C# programming for the Compact Framework
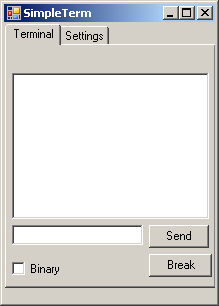
As always when you want to try a new technique or programming language, it works best if you have a goal. Just writing 'a program' , or re-typing exercises from books seldom gets me excited. So when I found out that .NET 2.0 finally contains a native Serial port control, I decided to create a terminal program for use on the Pocket PC. Since I often work with instruments that send (binary) data on a serial port, it's someting I wanted to have for a long time.
As mentioned before, the SharpDevelop 2.0 IDE is a very good environment for creating C# programs, but unfortunately it has no direct support for the Compact Framework. Yet it's not too dificult to get a simple Windos Forms application running on a Pocket PC with CF 2.0 installed.
First you must have the CF2.0 installed on your pc, and you should also install the Windows Mobile 5.0 SDK. If you did this, you can find the CF assemblies in: C:\Program Files\Microsoft.NET\SDK\CompactFramework\v2.0\WindowsCE
 (At least, that's where they are on my computer.)
For convenience you can copy them to a root folder like C:\CF (like me), but you can also keep them where they are.
For the first try, keep it simple. Just create a new Windows Application from the File->New->Solution menu. Name it something like 'CFTest'. The designer presents an empty form, that's probably too large to fit on the screen of the Pocket PC, so resize it to 240 x 320 (the standard screen resolution for a Pocket PC) and place a button and label on it. You can also add an event handler to the button that for example changes the text of the label so you can check if the program is actually working.
Now you can compile and run it, just to see if this standard program works.
If so, it's time to change the settings so we can compile the same program for the CF.
First open the View->Projects window, and open the 'References' section on the project tree.
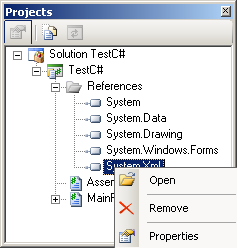 This will contain the default assembly references for a standard windows project. When you right-click on each assembly you get the 'Open, Remove, Properties' option as show here. Since all these references now point to the 'full' framework versions, you must delete them from the list. Click on each item, and choose 'Remove' untill the list is empty. Now right click the 'References', and select 'Add reference'. In the 'Add Reference' window, select the '.NET Assembly Browser' tab and click 'Browse'. Navigate to the folder with the CF assemblies (as shown above), and select all files with the .DLL extension. After closing the assembly browser by clicking OK, the Reference section in your project view should now contain only references to the CF assemblies. Note that one of the dll's is named 'mscorlib.dll'. This is the core library of the framework, and you might have noticed that it was not referenced in the standard project. This is because the compiler references this library automatically since it is always required for a .NET application. Unfortunately this means it always uses the default mscorlib.dll, which on a desktop computer, always belongs to the standard .NET library. To stop this unwanted behaviour we have to change the compile settings. Select Project->Project Options, and select the 'Compiling' tab. Here you can (and must) select [x]Do not reference mscorlib.dll.
Now it's time to Run the program again, just to see that we end up with a disencouraging long list of errors. But this is actually the nice part. All errors are related to functions or properties that are unavailable in the Compact Framework, and these lines can just be removed (or better yet, commented out) without breaking the basic functionality of the program. So just click on each line of the error list to take you to the 'unsupported' line, and turn this line into a comment. Yes, even the [STAThread] directive at the beginning of the main program can be removed.
Now Run the program again, et voila.. it works. It actually still looks identical to the first run. But now you can copy the executable you just created to a Pocket PC, and it will run exactly like on your desktop.
Thursday, April 27, 2006
Free C# programming for the PocketPC
The previous posting on this subject was actually an excerpt from my C-Scope website I've written a year ago. Thoug still valid, things have changed since then. (Ofcourse, you should say. Things change on a daily basis, and a year is 365 days, so..)
First there is the release of .NET 2.0, and .NET CF 2.0. The .NET CF is part of the new Windows Mobile 5 ,but you can download and install the free distributable on any Pocket PC. Drawback is that there is no freely available Windows Mobile 5 emulator anymore, so you need an actual device to test your applications. Good news is that a compiled .NET CF application will also run on your desktop, so it's not a major issue .
 Second there is the new, updated release of SharpDevelop, the excellent freeware C# IDE. that now supports (and even requires) .NET 2.0. I've just started to use it, and it's amazingly easy to create a .NET Windows forms application that runs on your desktop, and with some modifications it also runs on my Pocket PC. Next time I'll tell how.
First there is the release of .NET 2.0, and .NET CF 2.0. The .NET CF is part of the new Windows Mobile 5 ,but you can download and install the free distributable on any Pocket PC. Drawback is that there is no freely available Windows Mobile 5 emulator anymore, so you need an actual device to test your applications. Good news is that a compiled .NET CF application will also run on your desktop, so it's not a major issue .
 Second there is the new, updated release of SharpDevelop, the excellent freeware C# IDE. that now supports (and even requires) .NET 2.0. I've just started to use it, and it's amazingly easy to create a .NET Windows forms application that runs on your desktop, and with some modifications it also runs on my Pocket PC. Next time I'll tell how.
Free programming for the Pocket PC
Pocket PC,s are hot. Prices of Pocket PC's are falling, and with the car navigation as 'killer application' the number of users is increasing rapidly. So programming for the Windows Mobile platform is getting more important. And let's face it: it's fun two write programs that you without carrying a bulky laptop.
There are a few possibilities to write Pocket PC software. The 'easiest' way is to buy the the complete Visual Studio .NET suite. This has all the bells and whistles required to write Pocket PC applications in using Visual C or the .NET Compact Framework. Unfortunately it's also rather expensive...
Fortunately Microsoft also tries to promote the platform by giving away the free Embedded VisualC SDK. Though a little bit 'outdated' in appearance, it's a fully functional IDE , with compiler, debugger and emulator for writing MFC-based C++ code. So far I've written all my software using EVC 3 and 4 and it works quite satisfactory. It's probably still the most efficient way to write Pocket PC programs because the C++ language is very close to the Windows API. Unfortunately it's also difficult to master, and the learning curve is steep and long.
It should be easier to use the .NET Compact Framework, which is standard on Windows Mobile 2003 and higher. Unfortunately the only 'supported' way to write .NET CF programs is by using Visual Studio. So if you're not that rich you'll have to go the unsupported way:
Programming the .NET Compact Framework without Visual Studio
Although Microsoft insists that you can not compile .NET Compact Framework (.NET CF) applications without owning Visual Studio .NET, it is in fact possible. Check out Ward's article at http://www.ward.nu/computer/teletekst/compile.html on how to do this.Friday, April 21, 2006
Welcome to my life
Welcome. I suppose this is how it should start. Read on if you're interested, skip it if you're not (there are plenty of words on the web that are arranged in a more appealing way)
Subscribe to:
Posts (Atom)