 |
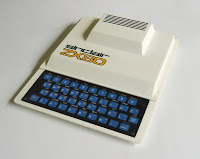
| The original ZX80 |
But my new printer has a build plate of 210x210 and it prints significantly better, so now is the time to build my own ZX-80.
Fortunately, thanks to the current retro computing revival, there are a lot of resources.First there is the ZX80 replacement keyboard on Sell My Retro. This is an excellent keyboard, with actual tactile switches, which makes it much easier to type on than the original. Also available:
original rivets, again on Sell my Retro.
And the design files are on Thingiverse. These were not exactly to my liking, so I made quite some changes. Mainly to make them easier to print, and to make sure that the new keyboard would fit.
There are a lot of images available, but most are just showing the complete computer from the front or side. There are lots of images on this site that also show the rear, bottom and inside. I used these to refine my 3D design, which is now available on Thingiverse.
And if you don't want or cannot print the case yourself, it is also available as a complete printed part on Shapeways. It's not cheap (about € 140,- for the set) but it obviously has a smoother finish and the bottom part is in one piece.
First part : the top cover.
It took 27.3 hours to print, but turned out really nice. Unfortunately there was some warping on the edges, but not too bad and I can probably correct this by heating it a little. And 4 solid layers for the top was not enough to completely hide the support structure, so the honeycomb pattern is still vaguely visible on the surface.Part two : the bottom section.
Since I could not print the whole bottom section on my printer I had to split it into two parts. By adding some support and making some minor changes to the basic shapes, I ended up with two printable pieces that can be bolted and glued together.The electronics
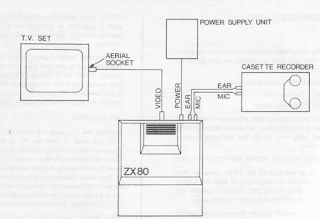
The internals are based on a Raspberry Pi Zero W. This is nice and small, and has enough power to emulate a ZX80. Since I wanted to make it close to the original I decided the rear connections had to be the same as on the original unit.Three 3.5 mm jack sockets, an RCA jack and the board edge connector. The manual shows what is connected where:
If we just apply 5V to the power jack we can connect that straight to the RPi (pin 2,4 and 6 on the header). The RCA jack can be connected to the TV out connection :
The keyboard
The ZX 80 or ZX81 keyboard is a simple matrix-keyboard. |
| Original keyboard schematic |
Numbering scheme:
KB1 5 ,4 ,3 ,2 ,1 KB2 6,4,2,1 ,3 ,5 ,7 ,9
GPIO 19,13,6 ,5 ,11 2,3,4,17,27,22,10,9
WiringPi 24,23,22,21,14 8,9,7,0 ,2 ,3 ,12,13
Note that I also mounted the 8 diodes in the KB2 lines, but I mounted them the other way around as compared to the original schematic.Basically this does not matter, it just inverts the logic as used in the software to read the pins. As I had already written the software before I notice that the diodes were reversed I decided to leave it that way.
To keep the PCB in place I simply bolted it to a small piece of wood that I taped to the bottom using some double sided tape.
Software
Reading the keyboard
Controlling the IOpins on an RPi is easiest using the wiringPi library, which is already installed on Raspbian. Check if this is really the case by typing 'gpio -v' on the command-line. If it is there it will return the copyright and version info. Typing 'gpio - readall' will give the pin-mapping from the GPIO to WiringPi pin numbers.Since I'm not the first one to read a matrix keyboard, I quickly found a Python project that does exactly what I wanted. This was created by Mr PJ Evans, and he did exactly what I'm trying to do now, only for a Spectrum.The Python code was not hard to translate to C.
I added one special combined key command to force a soft reset:
SHIFT + '1' + SPACE :Reset the ZX80(soft reset)
The Emulator
There are plenty ZX80 / 81 emulators available, but I needed one that was written in C, open source, and not too complex so I could inject my own keyboard reading code. I looked at Zesarux, which is a great emulator that supports teh full range of Sinclair computers. This however also makes it quite a massive project. And most of the naming and comments are in Spanish, which makes a bit hard for me to find my way around.So I opted for the SZ81 project. Since this is just for emulating the ZX80 and ZX81 it is much smaller. I assumed it was just a matter of finding where the keyboard is read, and add my own function to read it from the hardware keyboard. Which is partially true: I could get it to work for entering basic commands and running it. But as soon as the emulator switches to 'special' modes like loading or saving a file the program uses all kind of tricks to send virtual keyboard, joystick and mouse commands. And these always seem to conflict with the keys as pressed on the keyboard so after several days I just gave up on this one too.
So I went one step back, to the original xz81 emulator which SZ81 was based on. This uses standard X-Windows, and is pretty basic :http://www.svgalib.org/rus/z81.html. It's already an old project, and the source code is only available as a .ZIP file.
My version, with the keyboard reading routine, is available on GitHub.Note that I included the ZX80.rom and ZX81.rom file. This may be somewhat illegal, as mentioned by most emulator projects, but since they are that easy to find at multiple places I thought it would be rather odd not to include them.
You can check out the project using the following command:
git clone https://github.com/Cees-Meijer/ZX81-RPi.git
Before compiling it, make sure you have installed the X11 development libraries:
sudo apt-get install libx11-dev // for X11/Xlib.h
sudo apt-get install libxt-dev
sudo apt-get install libxtst-dev
It is set to compile for ZX80, but if you want the ZX81 version you can change the line:
int zx80=1; in 'common.c' to int zx80=0;
The scaling is set to 2 in the Makefile:
XDEF=-DSCALE=2 -DMITSHM
This is the right setting for using the composite video output. When using the standard HDMI output this can be set to 3 or maybe even 4.
Build the software:
sudo make xz81sudo make installSetting up the Pi
When the emulator starts it will take a while to boot and show all the Raspbian images and start screen, which does not add to the retro feeling. So I first considered using the pipaOS distro, which is also used by 'Obsolescence Guaranteed' for the PiPDP-8. This is very lightweight and boots really fast. But in the end I did have to install XWin, GCC and GIT anyway, so it's probably simpler to start with the standard Raspbian Lite.First use raspi-config to enable SSH, so you can use FileZilla to transfer files to the system. (Interfacing Options->SSH). By doing this first you make sure that if something goes wrong, and you get stuck in the emulator, you can still access the Pi.
Next go to boot options, and make sure it boots automatically using the 'Console Autologin' option.
Under 'Advanced settings', disable screen blanking ! This is very important, or else the screen will go blank after 10 minutes, and since there is no 'real' keyboard attached it will not come back again if you press a key on the ZX80 keyboard.
To start the emulator automatically on startup, edit the rc.local file:
sudo nano /etc/rc.local
Add the line:
sudo xinit /home/pi/projects/ZX81-RPi/xz81 &
Right before the 'exit 0'. (Don't forget the ampersand '&' on the end)
If this works, you can follow the instructions on how to remove all Raspbian boot images and texts.
We can speed up the boot time by adding the following lines to boot/config.txt:
# Disable bluetooth
dtoverlay=pi3-disable-bt
# Set the bootloader delay to 0 seconds.
boot_delay=0
Also in config.txt are the settings for the video output. To make sure the composite video output works, check these two lines:
#uncomment to force a a HDMI mode rather than DVI
#hdmi_drive=2
#uncomment for composite PAL
sdtv_mode=2
(or any of the other 5 available video modes)
Note that though 'hdmi_drive' is commented out, the Pi will likely still boot on HDMI if a HDMI monitor is connected.
Finishing touch: the stickers
After some research I found that the size of the 'sinclair ZX80' logo is 27 x 70 mm. That was enough to scale the image that I already found somewhere and so create some really nice stickers.The .pdf is available here. When printed on glossy sticker sheets they look really good.
Zesarux
Currently ZEsaRUX is one of the best ZX type emulators. As mentioned, I have looked into this one but decided not to use it for my project. For reference I do include some suggestions on how to compile and use it.The program is only available as source code, but there are instructions on how to build it on the Raspberry Pi as well.
When running Raspbian Lite from the command line, we will have to start from there.
First : Install GIT
$ sudo apt-get install git
Next install SDL
$ sudo apt-get install libsdl1.2-dev
Now I created a folder zesarux in my ./Projects folder and cloned it as follows:
$ sudo git clone https://github.com/chernandezba/zesarux.git
This does require that you have a GitHub account yourself, as it could ask you for your username and password !
cd /usr/src/zesarux/zesarux/src
We must be in the src directory of the zesarux project
$ export CFLAGS=-O2
$ export LDFLAGS=-O2
$ sudo ./configure --enable-raspberry
If this command executes successfully it will create the make file.
$ sudo make clean
$ sudo make
The 'make' command will start the compiling. This will take a while. On the Rpi Zero it took about 3 minutes.
According to the docs, The recommended way to start the emulator is using the following settings:
--disableborder --zoom 1 --fullscreen --vo fbdev --ao sdl --no-detect-realvideo
$ ./zesarux --disableborder --zoom 1 --fullscreen --vo fbdev --ao sdl --no-detect-realvideo
And yes, this works! after selecting the ZX80 in the menu we get a very realistic ZX80 screen.

It doesn't always work as expected. When starting it from a system with full Raspbian I got the emulator just in the top left corner, and had to add --zoom=4 to get to fullscreen.
Since I wanted it to start as ZX80, I also added the --machine ZX80 option.


