Saturday, June 17, 2017

Welcome to FPGA land

Welcome to FPGA land.. where the processing is faster, the resources more basic, and the number of three or four letter acronyms is huge. FPGA's (Field Programmable Gate Arrays) always fascinated me, but I never had the chance to work with them. Since they are a more application specific and harder to use than microcontrollers it has taken a little longer before they appeared in the hobby-space. Nowadays there are several development board available. Joel Williams did a really nice list of boards on his blog, so I don't have to repeat that. Still, a lot of the boards are $100,- and more, which still is a significant amount of money. Then I bumped into the Numato Labs 'Elbert V2 -Spartan 3A Development board' at only $29,95, which seems like a nice 'lets have go' price.
Getting it connected to my PC was easy. Just plug in the USB cable, and the board immediately starts running it's demo. Windows automatically recognizes and installs it as a USB comport. To use the board you should install the Numato Lab USB CDC Driver, which is available on their website. After downloading and unpacking the driver, just find the USB serial port in Windows Device Manager, right click and select 'Update driver'. Use the 'Browse my computer for drivers' option to point it at the driver you just downloaded and install. The port will now show up with the board name:

Software

This appeared to be the hard part. There is basically just one option to program the Spartan-3 and that is the Xilinx ISE Design Suite. It is free, but it has not been maintained since 2014, so Windows 10 is not officially supported. It's also HUGE. It's nearly 7GB download, and takes up exactly 20GB of disk space after installation. So be prepared to spend at least a day to get everything up and running.
First get the Xilinx WebPack at:
https://www.xilinx.com/support/download/index.html/content/xilinx/en/downloadNav/design-tools.html
I downloaded the 'All platforms' suite, which comes in 4 separate parts:
But further down the page there are also complete installers for either Windows or Linux.
All together this is 7 GB download, so you'll need some patience here.
If you downloaded the four parts as shown above, unzip only the first one (the one that ends in .zip, all the others have an extra .zx extension). This will create the file 'xsetup.exe'. Just click this to start the setup process. Which also takes at least an hour, so again: be patient.
After installation you will have to run the 'settings64.bat' file to setup the environment variables, which is in C:\Xilinx\14.7\ISE_DS.
Then click the ISE Design icon on your desktop to start the program..or not. On my machine it started, but crashed with the message: '_pn.exe stopped working'. The Xilinx forum came up with the following solution:


For everyone trying to use Xilinx ISE 14.5 in Windows 8 x64.
Rename libPortability.dll to libPortability.dll.orig, and copy libPortabilityNOSH.dll to libPortability.dll.

Do this in:

C:\Xilinx\14.5\ISE_DS\ISE\lib\nt64
C:\Xilinx\14.5\ISE_DS\common\lib\nt64 (copy dll from first location)

 This turns off SmartHeap.


OK. So we'll have to do without the SmartHeap, whatever that is. But now the program indeed starts fine, also on my Windows 10 machine.
Next step is to acquire a license. The software points you at the right page on the Xilinx website, where you'll have to register again, select the required license and have this key mailed to you. This can be imported into the software, and finally we can start doing some real work...
  

Programming

A FPGA is programmed using a HDL (Hardware Description Language). There are two common flavours right now: Verilog and VHDL. I chose VHDL, mainly because I a colleague lent me a book named 'FPGA Protototyping By VHDL Examples Xilinx Spartan-3 Version ' by Pong P.Chu. (there is a Verilog version too, so it does not really matter).
Now this is a really expensive book, but there are also plenty of online resources. However, they may not all be specific to the Spartan-3. The FPGA centre for example has a nice VHDL Starter Guide.


Sunday, March 05, 2017

LoRa with the LoRa Bee

For some time already LoRa is the new hype. This Long Range Low Power radio technology makes it possible to send small amounts of data over long distances using very little power. I's associated mainly with the LoRaWAN network and IOT applications, but LoRa itself is just the radio and the low-level protocol that is used to transmit and receive bytes. You could just use two transceivers to transfer data one to one, not using any network protocol or dedicated access points.

As I wanted to start experimenting with LoRa at lowest possible costs I bought a set of LoRa Bee modules from Dragino. At US$36 ( including shipping) for a set of two, it was the cheapest option at the time (Second half of 2016). That they also came with a neat antenna was definitely a plus.
But when it became time to actually connect them and send some data,I found this a little bit harder than expected.
First the 'Bee' form factor itself. Its got a 2 mm pitch header that will not fit a standard breadboard. And the pins are too small for standard female to male jumper wires.
Second it is 3.3V only. So I bought an Arduino Mini Pro, 8MHz - 3.3V version, and made some jumper wires from an IC socket and a standard header.
It's connected as follows: NSS-10, MOSI-11, MISO-12, SCK-13.

The WAZIUP LoRa Project


Next we need some software to drive it. And here it gets a bit harder. There are so many options, many extensively documented but usually in an experimental state. I found the article by Congduc Pham, 'A DIY low-cost LoRa gateway' to come closest to what I wanted to achieve. And it actually contains a lot of information on connections, theory and applications. Professor Pham developed a simple protocol for just transferring data from multiple end-points to  central server, without the overhead of the full LoRaWAN stack. All this as part of a 'WAZIUP' project that aims to bring this type of networking to sub-Saharan African countries.
By just following the instructions in the .pdf it's easy to install the program to the Arduino and get the software on the Raspberry pi.

A few pitfalls that I found while getting this all to work:


- The instructions tell you to clone the GIT repository . But GIT is not installed by default on  Raspbian. Use the following commands to get it :

$ sudo apt-get update
$ sudo apt-get install git-core

- Compiling the Lora Gateway software for Raspberry Pi B+. Since it is a B+, I compiled it for the the Raspberry Pi 2 , but later I found that my board is the original Raspberry Pi B+, which actually is a Raspberry 1. So if nothing happens after you start the lora_gateway, check your version.

- Minimal time between messages. I started with the 'Arduino_LoRa_temp' program, but I changed the time between messages on the Arduino to 1 minute  ( idlePeriodInMin = 1; ).  After a while I noticed that the gateway did not receive every message, but actually only one in two. It looks like the software limits the amount of transmitted bytes per hour. After increasing the interval to 2 minutes it worked fine. When using the 'Arduino_LoRa_InteractiveDevice' program I noticed that this has no limitations, and you can send multiple messages with short intervals. Officially there is a limit on the available radio time (Time On Air or ToA) of 1%, meaning you should not have actual transmissions for more than a total of 3.6 seconds per hour. This is explained in section 29 of the FAQ.


- The driver software is called SX1272.cpp, but I have a RF95 . The SX1272 is identical to the RF-95 as used on the Lora Bee.

- When the messages are received on the gateway, but the message itself is unreadable they ar probably AES encrypted, and the gateway does not decode this. For testing it's easier to disable AES. Just comment out the define:
//#define WITH_AES

- CAD = Channel Activity Detection.
- SIFS =  Short InterFrame Space

What it looks like on the RPi when it's running:

(And a minor issue, actually only related to the Rasperry Pi: SSH is now disabled on Raspbian. I could not connect through SSH to my Raspberry Pi running Raspbian Lite. An article on the RPi site explains that on newer version SSH is disabled by default. It also has the solution: just add a file 'ssh' to the root folder of the SD card. Make sure you change the password..)

What's really cool about the code is that mr. Pham made clever use of the ArduPi library so the code for the Raspberry Pi and the Arduino is (almost) identical.

LoraWan

When you want to go for a solution that is compatible with the LoraWan network, I suppose nothing beats the simplicity of the LoPy, an integrated module with Lora, WiFi and bluetooth, programmed in Pyton. There is a nice introduction on Element14.

Using LoraWan and the associated 'The Things Network' requires a nearby gateway. Which, if none is available, you can build yourself. At a total cost of about €200,- this is definitely not a bad deal. But if that's a little too much for just  some simple experiments you can also build a super cheap single channel gateway.

Tuesday, February 14, 2017

Recovery of a ZLinx ZP24D Radio Modem

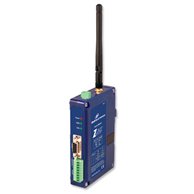
The ZP24D-25RM is  a 2.4 Ghz radio modem by B&B Electronics, branded as 'Zlinx'. Although sold as Plug&Play, it comes with basic software that actually shows quite a lot of options.
And if you get some settings wrong (like the sleep mode) , it may become impossible to access the modem.
The standard software however does not have a solution for this. There is no way to revert to 'Factory Settings' without connecting to the modem in command mode, which is no longer possible because the settings are wrong. There is no reset button or switch setting to manually reset it, so you are stuck .

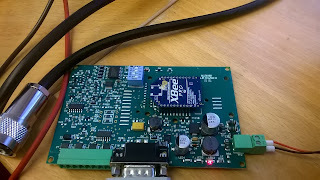
When opening the modem in search of a reset-switch, it was found however that the this unit is actually just a standard XBee module with additional interfacing electronics.

The XBee is a XBEE PRO S1, a fairly common module, which makes searching for a solution a little easier.


The following comes from the Digi website, ( http://knowledge.digi.com/articles/Knowledge_Base_Article/Recovery-procedure-for-XBees/?q=xbee+reset&l=en_US&fs=Search&pn=1 ) and disciusses ways to recover a 'sleeping Xbee:


A note regarding sleeping XBees:
If sleep mode has been enabled, the XBee may appear to be unresponsive since X-CTU expects the radio to be awake when performing any action on the radio. To see if the module is sleeping, go to the terminal tab and watch the Line Status indicator. If CTS periodically flashes, then the module is sleeping and only momentarily waking up.

Now this is exactly what has happened to my Zlinx. And they offer a solution, which almost works, except for a few issues.

First we will need the 'X-CTU' software, legacy version 5.2.8.6. :
 https://www.digi.com/support/productdetail?pid=3352&type=utilities
 (This was hard to find on the Digi website, but just Google it and the page will pop up.)


Then, if the X-CTU software connects to the unit, it will not recognize the module since it contains non-standard firmware.
To solve this, go to the folder where the ZLinx software is installed (E.G. C:\Windows\Program Files(x86)\B&B Electronics\ZLinx\ZlinxManager) There you'll find the folder 'Update' with the firmwares for the different types of Zlinx modems. Now copy all these folders to the 'update' folder in the folder where the X-CTU software is installed. (E.G. C:\Program Files (x86)\Digi\XCTU\update).

Now you can start the X-CTU software, select the right COM port and baud rate and then go to the 'Modem Configuration' tab. Select the modem type from the drop-down box:
FIRST click 'Show Defaults', so all settings are factory default. Then click 'Write'. The software will try to connect to the modem, and fail:
Now it's time to reset the XBee by switching power Off and On. The program will continue, and write the default settings to the XBee.